"Overkill is under-rated..."
This model is available to purchase via Wyrd Games various sale events or via their 'Guilder' scheme if you're lucky enough to be (or be willing to perform 'favours' for) a local Henchmen or attend certain events...I acquired mine via one of the aforementioned sales...it also came in a bag rather than a box...making this an unbagging I suppose...
The Alternate Lazarus bag contains enough parts for one miniature...namely Alternate Lazarus. It also contains a stat card for him though there are no upgrade cards. Should you inexplicably be looking for the original version rather than this one then it's feature can be found HERE.
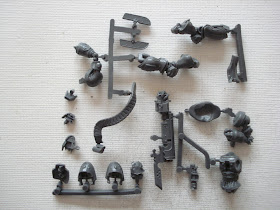
Alternate Lazarus - Sprue and Parts
The bag has a pile of mostly loose parts in it some of which are attached to bits of sprue. I've only taken pictures of one side because to be quite honest I couldn't be bothered to flip them all over...
Alternate Lazarus - Stat Cards
Stat cards in the official format can now be downloaded from Wargame Vault for a nominal fee from HERE.
Should there be any assembly issues with the model then they will be listed in the appropriate section and you can view larger versions of the smaller pictures or instruction pictures by clicking on them.
Alternate Lazarus - Instructions
Some General Notes on Assembly
Many of these models contain quite small parts so depending on how dexterous you are you might consider getting yourself some tweezers. Dry-fitting is also always a good idea in case a part needs a tiny bit of extra filing or filling as some of the fits are quite tight. Where the parts on the sprue are quite thin (chains, weapon shafts, cables and the like) then it might be better to remove parts with a sharp scalpel rather than cutters.
Alternate Lazarus - Assembled
This new version of Lazarus is made of a different plastic than their usual and the official instructions recommend using superglue rather than plastic glue...as I always use superglue this didn't make a lot of difference to me...it's also slightly softer which makes clean-up easier though be careful you don't put to much pressure on it and damage anything...
This is a fairly simple build as long as you're systematic though there are a few points worth noting. Firstly there's some play in the joints where the legs attach to the body so dry-fit if you want to ensure that the feet lie flat. I deliberately angled mine slightly so I could have one foot standing on a raised piece but you can make the pose flat if you wish. There's also a slight bit of play in the arms and as you have to align the left arm with a piece of the hand that's attached to the gun then check the positioning is correct before gluing.
There's a slight difference between the front of the shields on the gun and their rears and they will fit on either way around. I had the slightly raised piece at the rear but it's possible I'm wrong...it does happen occasionally...
Alternate Lazarus - Comparison Picture
Here's a picture comparing the earlier version with this alternate one...
Alternate Lazarus - Rotational View
Here's a rotational view...
Thoughts and comments are (as usual) most welcome.
I purchase my miniatures from Leodis Games (Link Below) and can highly recommend them.
Should you ever choose to purchase something based on one of my features or reviews then it would be nice if you could let the company know where the inspiration came from...who knows...they might be grateful to the poor unappreciated blogger who sent you their way...if however I've put you off a product...well...you can keep that info to yourself...


No comments:
Post a Comment