Editors Note - This tutorial is for version 1.5 of the Malifaux rules and has been left available for reference only. Some Malifaux 2nd Edition Tutorials can be found here...as well as quite a few of these old ones, lol.
Occasionally your going to want to risk a shot into Melee.
This may be a last ditch attempt to kill a particular model, playing the odds (if there are more enemies than friends involved), your own models might be particularly tough or have lots of Wounds or maybe your just a natural risk taker...
The rules for doing this are fairly simple and apply to any Ranged Strike or Spell (Basically anything with the little gun symbol next to it).
First the Attacker declares a target for the ranged attack and then flips one Fate Card for the target and each model in its Melee range as well as any model that might be engaged with it (LoS isn't necessary). Should the model be Height (Ht) 3 or more then you have to flip an extra card for it (so two rather than one). In the event of a draw the attacking model gets to choose.
When resolving the ranged attack to represent the fact that making an accurate shot into the whirl of Melee isn't exactly simple, the target model gets +1 to its Defence (Df) for each model it is engaged with. Should the attack target something other than Defence (Df), such as Willpower (Wp) then that stat gets the bonus.
Example 1 - Simple.
Lady Justice has shown a complete disregard for her own Death Marshals and is attempting to finish the rampage of the legendary Izamu the Armor regardless of any collateral damage...
Izamu the Armor (A) has a 3" Melee Range so all three Death Marshals (B, C and D) are engaged with him and are therefore all potential targets for the attack.
As Izamu the Armor (A) is Height (Ht) 3, two cards are required to be flipped for him and one card needs to be flipped for each of the Death Marshals.
The cards 1 and a 13 are flipped for Izamu, a 5 for Death Marshal (B), 3 For Death Marshal (C) and a 10 for Death Marshal (D). So as the lowest card has been flipped for Izamu, he is the target that gets hit...looks like Lady Justice got lucky this time.....
The attack is then resolved as normal though Izamu gets +3 to his Defence as he is engaged with three targets.
Example 2 - Something Trickier.
Not to be outdone in the 'casual disregard for Minions' category, Seamus has decided to shoot into Melee as well...however by now the combat has got even more complicated with the addition of a couple of Rotten Belles.
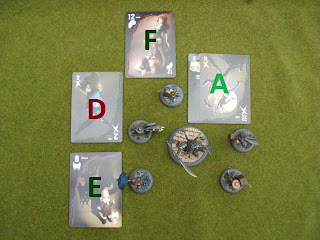
 This time the target is Death Marshal (D). As you can see from the diagram he is engaged with Izamu the Armor (A) who is within his Melee range.
However, despite the fact that he himself (D) is only engaged with Izamu (A) The Death Marshall is within the Melee range of Both of the Rotten Belles (E and F). Models B and C are in the clear...this time...as they aren't engaged with the target and the target isn't in their Melee range either.
This means that Models A, D (The original target), E and F are all potential targets of the attack.
As before we have to flip 2 cards for the Height (Ht) 3 model (A) and one each for the others (D, E and F).
Model A gets a 2 and a 11, D also gets a 2, E flips an 8 and F flips a 12. So Izamu (A) and the Death Marshal (D) are tied for lowest place.
In the event of a draw the attacker decides on the target so he selects the Death Marshal (D). The aforementioned Death Marshall gets +3 to his Defence for the 3 targets he's engaged with.
If you have any questions, find any errors with this tutorial or would like some further examples then feel free to leave them in the comments section below.
Acknowledgements.
I'd also like to thank Nathan and Gerard from my FLGS whose game created the inspiration for this tutorial mainly due to Nathan's insistence on unloading all his Guild Rifleman's shots into a combat for no clearly identifiable strategic reason, lol.


No comments:
Post a Comment