"Speak up dear..."


The Abuela Ortega box contains enough parts for one miniature...namely Abuela Ortega. It also contains a stat card for her though there are no upgrade cards.
Abuela Ortega - Sprue
The box has one sprue in it split into two pieces (so it actually fits in the box one presumes) as well as the aforementioned cards. Here's pictures of both sides of them...


Abuela Ortega - Stat Card
Wyrd Games didn't like my publishing pictures of both sides of the stat cards so you'll have to make do with this...

Should there be any assembly issues with the model then they will be listed in the appropriate section and you can view larger versions of the smaller pictures or instruction pictures by clicking on them.
Abuela Ortega - Instructions
These instructions have an issue that they seem to imply that you can assembly Abuela and then add her to the wheelchair but if you do it that way she doesn't go together correctly. I'll show pictures of both versions of assembly so you can make up your own mind...
These instructions have an issue that they seem to imply that you can assembly Abuela and then add her to the wheelchair but if you do it that way she doesn't go together correctly. I'll show pictures of both versions of assembly so you can make up your own mind...

Some General Notes on Assembly.
Many of these models contain quite small parts so depending on how dexterous you are you might consider getting yourself some tweezers. Dry-fitting is also always a good idea in case a part needs a tiny bit of extra filing or filling as some of the fits are quite tight. Where the parts on the sprue are quite thin (chains, weapon shafts, cables and the like) then it might be better to remove parts with a sharp scalpel rather than cutters.
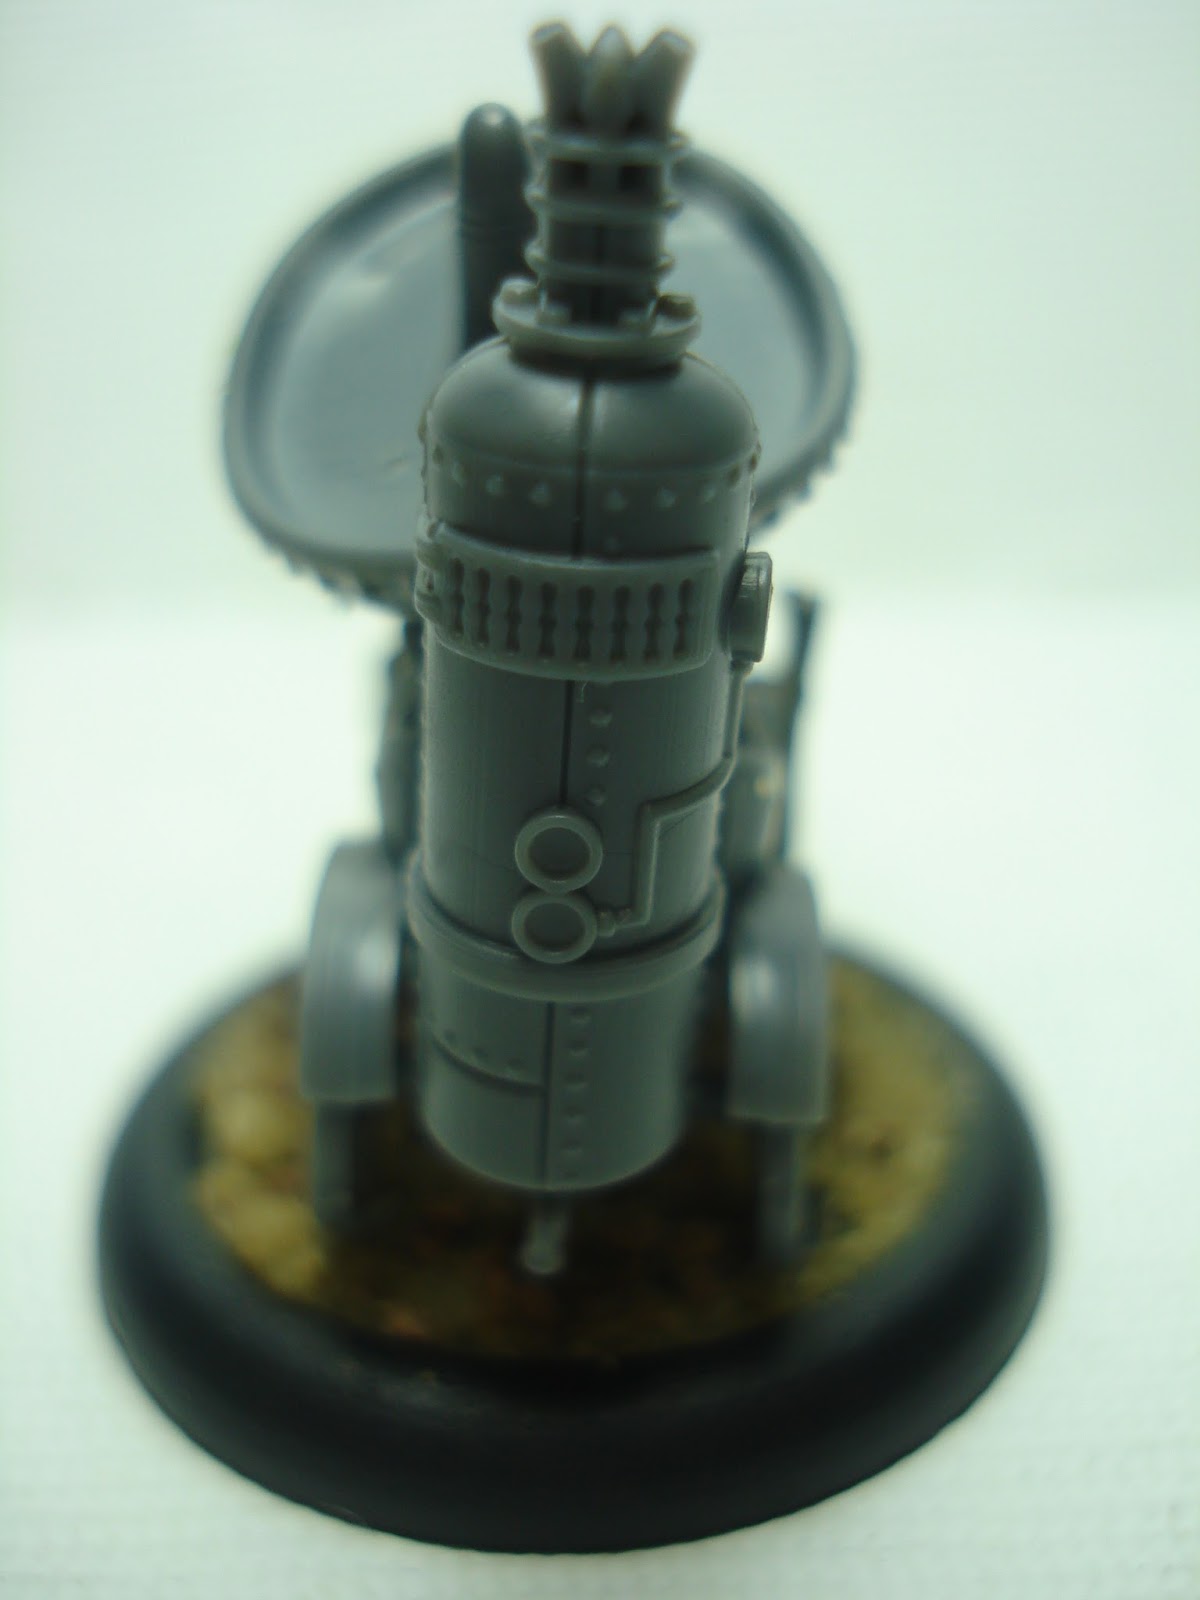
Abuela Ortega - Assembled
This was a difficult model to photograph due to the shape of it so there's a few more close-ups than I'd normally do to include all the detail. Also in order to make the assembly guide make sense the assembly instructions will be below the assembled pictures along with the close-ups rather than at the top where I normally put it.
The correct method of assembly is to have her sitting back in the chair and if you do it that way then following the instructions will lead you astray as you actually have to build her around the chair to build her right. If you build her separately then she'll sit further forward in the chair and will look completely different. The choice is of course yours but the first method is apparently the correct one..


If you've fully built Abuela before adding her to the chair you'll have to attach her right hand directly to the sleeve bit and the gun doesn't quite fit in the indentation in her lap and the finished product looks like this.


The boiler section on the rear of the wheelchair is fairly simple with the pipe pieces on the bottom of the boiler aligning with their opposite number on the rear part of the chair. There is however a small tap on a pipe that slots in under the boiler that you may find a little fiddly though the location point is fairly easy to attach to. The main boiler 'stack' is all one piece

Next is the wheelchair. The two halves attach to the part of the seat attached to the boiler to which you then add the wheels and the brake lever. The wheels have a small notch on the shaft that attaches under the wheelchair body and though this is an adequate location point I wouldn't put any weight on the wheels until you're sure that the glue has gone off thoroughly or the weight may push the wheels into an odd angle. The brake lever has a location point but the part itself is thin so be careful not to snap it.


Abuela's main body consists of a leg section and a body section. The left hand is separate and quite small while the right is attached to the forearm and is holding a gun so is much easier to handle. Also the one piece of her hair on the right hand side is inexplicably a separate piece. Despite what the instructions would lead us to believe you can't assemble her completely and then put her in the wheelchair as part of her arms are in the seat section.
The hat has a cut out section containing three skulls with the other two that are further back being individual parts. The three skulls part has them attached to an angle shape that supposedly slots into the front part of the hat. The problem with this (on my model at least) was that it didn't fit very well and it's difficult to put any pressure on it without bending and possibly breaking off the skulls. I trimmed mine quite a lot but it still wasn't a great fit so I'll need to do a bit of filing. You'll see what I mean if you scroll back up and look at the hat on the sprue pictures. The only issue with the other two skulls is how tiny they are...
The hat has a cut out section containing three skulls with the other two that are further back being individual parts. The three skulls part has them attached to an angle shape that supposedly slots into the front part of the hat. The problem with this (on my model at least) was that it didn't fit very well and it's difficult to put any pressure on it without bending and possibly breaking off the skulls. I trimmed mine quite a lot but it still wasn't a great fit so I'll need to do a bit of filing. You'll see what I mean if you scroll back up and look at the hat on the sprue pictures. The only issue with the other two skulls is how tiny they are...


The pipe is after that almost a relief. Yes it's small, yes it's delicate and yes there's not a great contact point but at least it isn't a tiny skull...
Abuela Ortega - Comparison Picture
Here's a comparison picture between the original metal version and the new M2E plastic one. As you can see there's a significant difference.

I gave up on the hat, I could not get it in.
ReplyDeleteI wish I saw that you had to put her in the chair first I can't get her in. Also her head decided not to sit properly. So her head is currently turned to the right some how. I dont know why.
The official instructions give entirely the wrong impression which is why the assembly guide portion of this unboxing is significantly longer than most of them.
DeleteI've seen a few assembled ones with the head slightly tilted so it's not just you.
Thanks Gmort for another excellent review. You've saved me from falling into some of the pitfalls and I think it's now built pretty much correctly.
ReplyDeleteIn case it helps others, I built her in this order:
(1) boiler, seat rear and tap
(2) all the hat bits
(3) both head bits
(4) lower body sandwiched between the two halves of the car
(5) before glue from previous step had fully dried I added seat rear/boiler, top half of her body and her left hand (with shotgun sat in her lap)
(6) plonk on the head with chin pointing up
(7) plonk on the hat so that the back of it just touches the boiler
(8) rear wheels / front wheels / handbrake / her left hand / stick pipe into mouth
I also had to widen the hole in the hat brim and shave down the front section with the three skulls to get it in. Big gaps left behind will need a lot of filling.