Showing posts with label Malifaux Tutorials. Show all posts

Monday, 11 November 2013

M2E Rasputina Painting Guide - Part 1 - The Icy Bits


I had several requests about the colours and techniques used on my better halves Rasputina crew so I got her to list them for me in some kind of logical order.

1) First they were base coated black and then given a lighter base coat of white which left some of the black showing through in the deeper recesses. Both of these coats were done using Army Painter spray paint though she also uses Games Workshop ones...just not in this case...

2) Then the model was painted all over with a wash made from Army Painters 'Deep Blue' followed by a mix of Blue and Green wash (actual washes this time..she uses the Vallejo ones) or if you don't have actual washes a very watered down Hawk Turquoise will apparently do (It's an old Games Workshop paint but there's probably a modern equivalent).

3) Lightly dry-brush again with 'Deep Blue' and highlight with 'Ice Blue' (again it's an old GW one but there's bound to be equivalents) on the raised areas and use the same colour as a dry-brush on the larger areas to soften the colour a bit.

4) Highlight on top of that with white. You will then need to paint vertical wobbly lines as can be seen on the Ice Golem...a good example is circled on the below picture...


5) To add additional depth dry-brush the middle parts with the same 'Hawk Turquoise' mentioned earlier (or whichever equivalent you've discovered). Again the rock on the Ice Golems arm is a good example. Make sure this is only put where it's been done on the pictures rather than all over as this will remove the effect of depth rather than enhancing it.

6) You should now have a wonderful ice-like effect...hopefully...


At some point there will be a 'Part 2' to this article covering the none icy parts...as soon as I can get my other half to write it all down for me that is...

Thoughts and comments are (as usual) most welcome.

Sunday, 10 November 2013

M2E for Beginners - Shooting Into Melee

Many of the Version 1.5 mechanics have changed slightly in Malifaux 2nd Edition which can cause some confusion when your used to the old version. Rather helpfully though, the M2E version is usually simpler.

For reference purposes the 1.5 tutorial can be found here should you be interested in the differences.

Inevitably in Malifaux your going to get into Melee range at some point and it's also likely that you'll have models available whose only expertise is shooting. At this point certain more ruthless players might decide that the chance of hitting their own model is worth the risk...I do it all the time...don't judge me...

An Example.
Several Outcasts from the Viktorias 'Hired Swords'have decided to go hunting for the considerable bounty on the head of Seamus, the Mad Hatter (A). With his usual disregard for any life but his own he's sent a Rotten Belle (B) to occupy them while he makes his escape. The Student of Conflict (C) and Taelor (D) are in combat with this minor inconvenience.


As you can see from the above picture the combat is a bit of a mess. Taelor (D) is engaged with the Rotten Belle (B) as is The Student of Conflict (C) though the Rotten Belle (B) is only engaged with the Student of Conflict (C).

Seamus (A) has decided to even things out by randomly shooting into the combat...

Firstly Seamus (A) picks a target which in this case is the Student of Conflict (C). It's worth noting that effects such as Terrifying and the like do not occur at this point he is merely picking an initial target and determining Range and LoS (Line of Sight) to it before we see which one he actually hits...


We now measure 2" from the initial target in order to ascertain who-else might get hit by the ranged attack. In this case the Rotten Belle (B) and Taelor (D) are also potential targets in addition to the initially targeted Student of Conflict (C).

Here's a top view so you can see who's in danger and who's safe...


We then need to flip a card for each potential target to see who gets hit by the ranged attack. So select a viable target and flip a card and then move onto the next viable target. In the unlikely event that the firer is also within the 2" target zone he (or she or it) doesn't flip a card for themselves. Whoever flips lowest is the model that gets hit...

A 5 is flipped for the Rotten Belle (B), another 5 for the Student of Conflict (C) and a 9 is flipped for Taelor (D). In the event of a draw the acting model gets to pick the target and rather unsurprisingly Seamus (A) selects the Student of Conflict (C). Any effects that effect a unit being targeted (such as Terrifying, Manipulative, etc) are now bought into play. 

Now the shooting attack is resolved as normal using the standard method which can be found here. 

A few notes...

1) The 2" distance is the important factor when deciding viable targets, not Melee range as with version 1.5. It is therefore possible for a model to be in Melee with the target and yet not be a viable target (if it had a 3" Melee range for example).
2) It is theoretically possible that the randomised target could be out of range or even out of LoS from the shooter but if the target is hit the attack still hits in these specific circumstances. 
3) If the randomised target is in cover then any bonuses for cover are resolved as normal.

Thoughts and comments are (as usual) most welcome.

Tuesday, 22 October 2013

M2E for Beginners - A Basic 'Opposed' Duel Part 2 - Casting

In Part 1 we looked at shooting using a small dispute between a Rotten Belle and a Guild Guard which can be found here. Now lets move onto Casting...

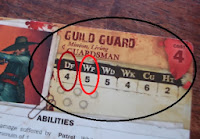
In general a spell is either a physical effect (and will target your Defence (Df) just like a bullet or a blade or is an attempt to attack you mentally (and will instead target your models Willpower (Wp). As with all things in Malifaux there are the occasional exceptions but generally this is true the majority of the time.


In the 1.5 version Casting worked slightly differently in that the caster generated his total in it's entirety before the opponent flipped any cards at all and if the spell was unsuccessful then they had no need to flip any cards. In M2E this works slightly differently as all opposed duels now are functionally identical. Whether casting a spell, shooting some-one in the head or giving them a good slap the procedure is basically the same though there are a few small differences which we'll cover as they occur...


So the Rotten Belle (B) has decided that the Guild Guard (A) is far too far away from her in order to continue their debate about their clashing outfits and has decided to cast a spell in order to remedy that situation.

This spell in fact...


This particular spell has a Range of 18" so the Rotten Belle (B) measures the distance before committing herself to the Action and finds she's easily in range. All spells in M2E have the base casting value (the number you add your card flip to) built into them and they also have any 'built-in' card suits listed next to them.

In this case the spell has a nice high value of 8 and has both a Crow and a Mask built into it which means that regardless of the suit on the card you flip the casting player automatically counts as having a Crow and a Mask in addition to any suit that may be on the flipped card.

There is also a target value (12 in this case) which often also has a suit requirement which in this case is a Crow and a Mask. For the spell to be cast successfully the caster needs to equal or beat the target number as well as fulfil all the suit requirements...don't worry it will make sense in a bit...

A Brief Note.
It may seem somewhat redundant for a spell to already have the suit requirement (or requirements) for casting built in but this makes more sense when you realise that several models have abilities that can modify or remove suits completely from your casting value. The Arcanist Master Rasputina (for example) has the 'Counterspell' ability which removes all suits from an enemy Casting (Ca) Action which targets her. So the above mentioned 'Lure' Spell would lose both it's Crow and Mask  from the casting value effectively making it impossible for the Rotten Belle to cast against her as there's no way for a model without the ability to use soulstones to generate two card suits from the card flip...

The Rotten Belle (B) has already discovered that she's in range of the spell so now flips a card to add to her casting value of 8 and needs a total of at least four...and unfortunately only flips a 3 of Rams.
Even though the spell has failed to reach it's target number the Guild Guard (A) still needs to flip a card just like in any other opposed duel and pulls a respectable 7 which added to her Willpower (Wp)of 5 gives a total of 12.
As the loser, the Rotten Belle (B) gets to cheat first but chooses not too and the Guild Guard (A) having won the duel has no need to cheat at all.

As she really wants to get up close and personal with the Guild Guard the Rotten Belle decides to spend her second Action to cast the spell again and this time she flips a far more useful 11 of Crows giving her an impressive total of 17 and as we've previously mentioned she has the required suits built in. 

The Guild Guard flips an 8 of Masks which gives her a total of 13 and as the loser of the duel gets to cheat first. The Guild Guard would need a card of at least 13 value to beat the Rotten Belles total and she either doesn't have one or has no desire to use it...either way the spell is successful. Now our totals are established Triggers would be declared and as it happens the Rotten Belle has one.


We'll cover Triggers in detail in their own tutorial but for now all you need to know is that they're right below the Attack Action they apply to, have a suit requirement, are declared after duel totals are established and have an effect which occurs in addition to the normal effects of the Attack. This particular Trigger requires two Crows and the Rotten Belle (B) has one built into the spell and gained another one from the card flip. She can therefore choose to activate the Trigger or not as they're optional though there's rarely a good reason not to gain a bonus to an attack for free, lol.

The result of the spell is that the Guild Guard (A) is required to move it's Walk (Wk) towards the casting model (in this case the Rotten Belle) and finish it's move as close to it as possible.


The Guild Guard (A) ends it's move as close to the Rotten Belle (B) as possible as per the Spells listed effect. 

This particular spell involves a movement effect though it could just have easily set you on fire, poisoned you, driven you insane or locked you in a pine box. There are far too many spells to do examples of them all but they all follow the same rules to cast.


Now they're in Melee range of one another it's time to look at Melee attacks...in part 3 that is.....

Thoughts and comments are (as usual) most welcome.

Thursday, 25 April 2013

Malifaux for Beginners - Starter Set Soulstone Values

Editors Note - This tutorial is for version 1.5 of the Malifaux rules and has been left available for reference only. Some Malifaux 2nd Edition Tutorials can be found here...as well as quite a few of these old ones, lol.

I'm often asked about what people need to start Malifaux and those conversations inevitably move onto the Soulstone value of those Box Sets.

For an in depth examination of the contents of these sets then I recommend the 'Malifaux on a Budget' articles on The Murder of Ravens Blog but for quick reference I've listed the totals here. I've divided them by Faction and listed two totals. The first total is the actual Soulstone value of the crew and the second total is the value of the crew when their Soulstone Pool is maxed out.

For example - Lady Justice's Box Set comes to a total of 19 Soulstones and their Master (Lady Justice) has a Cache of 4 Soulstones. By adding enough Soulstones to max out her Soulstone pool to 8 we have a potential Maximum value for the crew of 23. Henchmen will have a dash in the Max Pool section as Henchmen have special requirements...for more information on Henchmen there's a tutorial here.

Arcanist.

Colette: 21 SS (26 SS Max Pool)
Kaeris: 24 SS (-)
Marcus: 22 SS (26 SS Max Pool)
Mei Feng: 25 SS (28 SS Max Pool)
Ramos: 28 SS (34 SS Max Pool)
Rasputina: 21 SS (25 SS Max Pool)

Guild.

C. Hoffman: 16 SS (20 SS Max Pool)
Lady Justice: 19 SS (23 SS Max Pool)
Lucas McCabe: 23 SS (27-31 SS Max Pool)*
Lucius: 26 SS (-)
Perdita: 25 SS (31 SS Max Pool)
Sonnia: 20 SS (24 SS Max Pool)

*Lucas McCabe can spend additional Soulstones to buy starting equipment so his total can vary.

Neverborn.

Collodi: 17 SS (-)
Dreamer: 19 SS (24 SS Max Pool)
Jakob Lynch: 18SS (24 SS Max Pool)
Lilith: 19 SS (23 SS Max Pool)
Pandora: 23 SS (26 SS Max Pool)
Zoraida: 25 SS (28 SS Max Pool)

Outcasts.

Hamelin: 22 SS (30 SS Max Pool)
Leveticus: 20 SS (28 SS Max Pool)
Ophelia: 22 SS (-)
Somer Teeth: 16 SS (24 SS Max Pool)
Viktoria: 24 SS (32 SS Max Pool)
Von Schill: 26 SS (-)

Resurrectionist.

Kirai: 19 SS (24 SS Max Pool)
McMourning: 23 SS (25 SS Max Pool)
Molly: 22 SS (-)
Nicodem: 22 SS (27 SS Max Pool)
Seamus: 18 SS (24 SS Max Pool)
Yan Lo: 19 SS (22 SS Max Pool)

Ten Thunders.

Misaki: 29 SS (33 SS Max Pool)

If you have any questions, find any errors with this tutorial or would like some further examples then feel free to leave them in the comments section below.

Tuesday, 23 April 2013

Malifaux for Beginners - Schemes

Editors Note - This tutorial is for version 1.5 of the Malifaux rules and has been left available for reference only. Some Malifaux 2nd Edition Tutorials can be found here...as well as quite a few of these old ones, lol.

Somewhere between 'Hiring Crews' and 'Deploying Crew' we have the 'Choose Schemes' part of the set-up procedure. This gives us a ridiculous combination of choices and can be a bit confusing the first time you stare at the list of options.

Firstly, schemes are completely optional. Though you can select up to two you are not obliged to do so and your Soulstone cache is increased by two for each scheme you choose not to take...however I wouldn't recommend this as a regular course of action as you are depriving yourself quite a few potential Victory Points (VP) by so doing. The other issue is that you are still limited to a maximum cache of 8 Soulstones at the start of the game so by not choosing Schemes you could potentially be wasting Soulstones...and one thing we don't want to do in Malifaux is waste one of our most valuable resources....

Broadly speaking schemes come in three different types.

General Schemes - These are Schemes that pretty much any crew can take generally have fairly straight forward requirements such as assassinating a certain model, keeping your Master alive or getting a certain amount of models to a certain area of the board, etc. These tend to be the best ones for a beginner to pick as they have fairly clear and simple to understand requirements.

Faction Specific - These are Schemes that can only be selected by a particular Faction and tend to play to that Factions strengths. Resurrectionists (for example) have a scheme that requires you to finish with more models than you started with, Arcanists have one that requires them to perform a set of magical rituals and so on. These schemes more often than not are biased towards a certain crew configuration so you need to think about what models your using before you decide on a scheme. As you select your crew after the main strategy is flipped this isn't a major issue.

Master Specific - Rather obviously these are schemes that apply to a single Master and invariably play to that Masters strengths, however their requirements are so specific that they may not suit your own play-style. Seamus's Scheme requires him to perform a particular task using his Totem and Sonnia Criid's requires her to use a specific Spell to gain a particular effect, etc...this is great if you were going to do these things anyway...but not...if your not...

There are some additional limitations as well.

1) Schemes generally give you more Victory Points (VP) if you announce what your up to rather than if you keep it a secret. Obviously this will depend on whether you think you can still accomplish it if your opponent knows what your up to ;-)
2) Any number of your selected Schemes can come from the General Schemes section but Faction Specific Schemes are only available at one per Master. At the point levels at which your playing most games you'll only have one Master so you'll be limited to just the one Faction Specific Scheme. In the event that your Master has more than one Scheme available to him you can only take one Master Specific Scheme per Master.
3) Some Schemes specify a particular terrain feature or model. Only one feature or model may be specified per Scheme per player. However there's nothing to stop you picking a scheme that coincides with your previously flipped for Strategy.

Obviously when picking Schemes it makes sense to select ones that compliment your Strategy and personal play-style.

Example.

A Resurrectionist Player is having a 35 Soulstone game of Malifaux, has flipped 'Claim Jump' as his Strategy and has chosen to use Seamus, the Mad Hatter and crew for the game itself.

In order to supplement his Master's meagre Cache of 2 Soulstones, his player has selected only 32 Soulstones of models during the Hire Crews phase so his starting Pool of Soulstones is now 5 and now moves onto the Choose Schemes part of the Encounter set-up.

At this point he could opt to not take any schemes at all and take an extra 4 Soulstones (2 per Scheme not taken)...but as he already has 5 Soulstones in his pool those extra 4 would take him to 9 and he's only allowed 8 which is quite obviously a waste of a Soulstone. This would also limit him to a maximum available Victory Points (VP) of 4 (If he successfully fulfils all the requirements for the Claim Jump Strategy) which is somewhat of a disadvantage should his opponent pick his maximum allotment of Schemes.

Instead he looks at his Strategy (Claim Jump) and decides that as he's heading to a marker away from his deployment zone anyway he might as well select Breakthrough as the first of his Schemes and as his opponent is undoubtedly going to be attempting to stop him accomplishing his Strategy he announces his first Scheme for a potential extra Victory Point (VP). He's going there anyway so what the hell ;-)

For his second Scheme he looks at the Faction Specific ones and decides that neither of them are going to be particularly useful and the Master Specific one is no use as it requires the Copycat Killer Totem and he hasn't taken it on this occasion. He decides to play it safe and take Bodyguard as his 2nd Scheme (as keeping your Master alive is always a good idea) and being as he'd like his Master to not be the target of every attack he notes this one down secretly.

He now has a potential Victory Point (VP) total of 7 (4 for Claim Jump, 2 for the announced Scheme of Breakthrough and 1 for the secret Scheme of Bodyguard).

After a few games you'll quickly get the hang of picking Schemes that compliment the Strategy you flipped and the models you selected. These Schemes are a very important part of both the Strategy and the fun of Malifaux and I highly recommend that you don't skip this part of the Encounter set-up.

If you have any questions, find any errors with this tutorial or would like some further examples then feel free to leave them in the comments section below.

Thursday, 18 April 2013

Malifaux for Beginners - Poison

Editors Note - This tutorial is for version 1.5 of the Malifaux rules and has been left available for reference only. Some Malifaux 2nd Edition Tutorials can be found here...as well as quite a few of these old ones, lol.

Several of the effects in Malifaux are represented by tokens of various kinds like Blight, Burning, Poison etc. and somewhat confusingly these all operate in slightly different ways.

Let's look at Poison...

Poison is usually associated with a weapon of some kind,


Though it may also be inflicted by other means,


When a model is hit by an attack with the Poison (#) or affected by an Ability with Poison (#) the number of tokens the target has is increased to the appropriate number (#) after the attack is resolved. If a particular Ability, Spell or whatever works differently then it will be indicated in the description.

Each time a model that has Poison Tokens attached to it begins an Activation it suffers one Wound (Wd) per Poison Token it has and then one of the Poison Tokens is discarded.

Admittedly that sounds a bit convoluted but as you'll see from the example it really isn't.

Example 1.
The Rogue Necromancy has decided to take a bite out of a passing Desperate Mercenary.


We'll presume the Rogue Necromancy (A) is successful in it's Fangs Strike against the Mercenary (B). After the attack has been resolved as normal we move on to the Poison effect.


The Rogue Necromancies Fangs are Poison (2) so we place 2 Poison Tokens (P1 and P2) next to the Desperate Mercenary (B).


On Activation the Desperate Mercenary (B) takes a Wound per Poison Token (2 in this case) and then one of the Poison Tokens (P2) is removed.


Example 2.
It's worth noting that Poison Tokens don't stack. Should a model with Poison Tokens attached be Poisoned again, then the total number of tokens is increased to the Poison number (#)...like so...

The Rogue Necromancy (A) has again attacked the Desperate Mercenary (B) and has Poisoned it again.

This is incorrect. The attack is Poison (2) but he player has added 2 additional Poison Tokens (P2 and P3) to the total (P1) on the model rather than increasing the total back to 2 (as indicated by Poison 2).


This is correct. The Fangs Strike is Poison 2 so the total number of Poison Tokens is increased back to the total of 2.


Example 3.
The Desperate Mercenary is having a particularly crappy day and is now in a fight with a Showgirl...


The Desperate Mercenary (B) is still Poisoned and is now in melee with a Showgirl (C). The Showgirl has used the 'Sirens Call' Spell to Paralyse the Desperate Mercenary in anticipation of using the particularly nasty 'Poison Gift' Action in order to inflict Poison (4) upon her which she promptly does.


The Desperate Mercenary's (B) Poison Tokens are now increased to 4 as the newest Poison attack is higher than the original one.


On it's Activation the Desperate Mercenary (B) will take 4 Wounds (One per Poison Token) and then remove one Poison Token (P4) reducing the total to 3.


To summarise then.
1) The attacked model has Poison Tokens equal to the Poison (#) number placed on it.
2) When it Activates the model takes a Wound (Wd) per Poison Token and then the number of Tokens is reduced by one.
3) Should the model be Poisoned again the number of tokens is increased to the Poison (#) number.
4) Should a subsequent Poison attack be of a lower number (#) than the number of Poison Tokens already attached then the total is unchanged...it's already the victim of a more deadly toxin...

If you have any questions, find any errors with this tutorial or would like some further examples then feel free to leave them in the comments section below.

Tuesday, 16 April 2013

Malifaux for Beginners - Firing into Melee

Editors Note - This tutorial is for version 1.5 of the Malifaux rules and has been left available for reference only. Some Malifaux 2nd Edition Tutorials can be found here...as well as quite a few of these old ones, lol.


Occasionally your going to want to risk a shot into Melee.

This may be a last ditch attempt to kill a particular model, playing the odds (if there are more enemies than friends involved), your own models might be particularly tough or have lots of Wounds or maybe your just a natural risk taker...

The rules for doing this are fairly simple and apply to any Ranged Strike or Spell (Basically anything with the little gun symbol next to it).

First the Attacker declares a target for the ranged attack and then flips one Fate Card for the target and each model in its Melee range as well as any model that might be engaged with it (LoS isn't necessary). Should the model be Height (Ht) 3 or more then you have to flip an extra card for it (so two rather than one). In the event of a draw the attacking model gets to choose.

When resolving the ranged attack to represent the fact that making an accurate shot into the whirl of Melee isn't exactly simple, the target model gets +1 to its Defence (Df) for each model it is engaged with. Should the attack target something other than Defence (Df), such as Willpower (Wp) then that stat gets the bonus.

Example 1 - Simple.
Lady Justice has shown a complete disregard for her own Death Marshals and is attempting to finish the rampage of the legendary Izamu the Armor regardless of any collateral damage...


Izamu the Armor (A) has a 3" Melee Range so all three Death Marshals (B, C and D) are engaged with him and are therefore all potential targets for the attack.

As Izamu the Armor (A) is Height (Ht) 3, two cards are required to be flipped for him and one card needs to be flipped for each of the Death Marshals.


The cards 1 and a 13 are flipped for Izamu, a 5 for Death Marshal (B), 3 For Death Marshal (C) and a 10 for Death Marshal (D). So as the lowest card has been flipped for Izamu, he is the target that gets hit...looks like Lady Justice got lucky this time.....

The attack is then resolved as normal though Izamu gets +3 to his Defence as he is engaged with three targets.


Example 2 - Something Trickier.
Not to be outdone in the 'casual disregard for Minions' category, Seamus has decided to shoot into Melee as well...however by now the combat has got even more complicated with the addition of a couple of Rotten Belles.

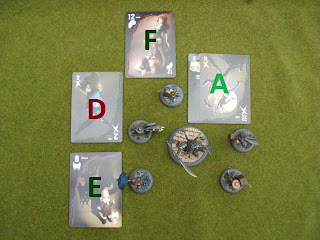
This time the target is Death Marshal (D). As you can see from the diagram he is engaged with Izamu the Armor (A) who is within his Melee range.

However, despite the fact that he himself (D) is only engaged with Izamu (A) The Death Marshall is within the Melee range of Both of the Rotten Belles (E and F). Models B and C are in the clear...this time...as they aren't engaged with the target and the target isn't in their Melee range either.

This means that Models A, D (The original target), E and F are all potential targets of the attack.

As before we have to flip 2 cards for the Height (Ht) 3 model (A) and one each for the others (D, E and F).

Model A gets a 2 and a 11, D also gets a 2, E flips an 8 and F flips a 12. So Izamu (A) and the Death Marshal (D) are tied for lowest place.

In the event of a draw the attacker decides on the target so he selects the Death Marshal (D). The aforementioned Death Marshall gets +3 to his Defence for the 3 targets he's engaged with.


If you have any questions, find any errors with this tutorial or would like some further examples then feel free to leave them in the comments section below.

Acknowledgements.
I'd also like to thank Nathan and Gerard from my FLGS whose game created the inspiration for this tutorial mainly due to Nathan's insistence on unloading all his Guild Rifleman's shots into a combat for no clearly identifiable strategic reason, lol.

Saturday, 13 April 2013

Malifaux for Beginners - Henchmen

Editors Note - This tutorial is for version 1.5 of the Malifaux rules and has been left available for reference only. Some Malifaux 2nd Edition Tutorials can be found here...as well as quite a few of these old ones, lol.


As well as Masters and Minions, another group known as Henchmen also exists.

Henchmen can be used either as normal(ish) Minions or as Masters in their own right. They're not quite as flexible as Masters however as they have some limitations.

If a character is capable of being used as a Henchman they will have the Henchman rule in the characteristics section like so,

This is the Stat card of Molly Squidpiddge who is a Henchman. The number after the Henchman characteristic (called the Henchman Reserve) affects her in certain ways that we'll come to later. Each Henchman will also have reference to a Special Forces type which in her case is Horrors. The model still has a Soulstone cost (9 in this case) which will be used should she not be the Master. Sometimes the Special Force will cover more than one model type...if so it will say so on the card. Molly (for example) can also hire models with the 'Belle' type as Horrors.
This card belongs to another Henchman model called Collodi. Like Molly above he has the Henchman characteristic followed by a number and a Special Forces type (Dolls). Also like Molly he has a Soulstone cost for when he's not being used as a Master.


Now you know what your looking for, lets look at some common traits that apply to all models with the Henchman model type. Firstly, Henchmen all have the Use Soulstone Ability whether it's listed on their card or not. Secondly, a crew containing a Henchman is no longer limited to the two model hiring limit on Special Forces...

Normally if a model is part of a Special Force (Horrors, Dolls, etc) a crew can only hire two of them and those two must be from the same Special Force. If however your crew contains a Henchman then this limit is lifted and you may hire as many as you can afford...you can still only hire from one Special Force though.

Finally if the crew is being led by one or more Masters you can only hire one Henchman per Master.

An Example.


Seamus, the Mad Hatter would like to hire two Crooligans and a Rogue Necromancy as well as a few Rotten Belles and a couple of Punk Zombies. Unfortunately the Crooligans and the Rogue Necromancy are all Horrors and he is limited to two Special Force models so he couldn't hire all three...


The player decides instead to use Molly Squidpiddge as his Master. Because she has Special Forces (Horrors) on her stat card the two model limit no longer applies so she can take both the Crooligans and the Rogue Necromancy and because her card specifically says so, she can also take the Belles...unfortunately she can't take the Punk Zombies as they are neither Horrors or Belles...


This time the player takes Seamus, the Mad Hatter as his Master but also takes Molly Squidpiddge. This time he can take all the Horrors he wishes as Molly has the Special Forces (Horrors) rule and Seamus can take everything else because they're all legitimate choices for him and both him and Molly can take Belles...success at last...


With that out of the way, lets look at the two different possibilities. Either the Henchman is part of a crew or leading a crew...

Leading a Crew.
We'll use Collodi as an example.


1) When leading a crew the Henchman's Soulstone Cost becomes 0. So Collodi wouldn't cost you 8 Soulstones (circled in red) he'd cost 0 just like a Master would do.
2) Every Henchman has what is referred to as a 'Henchman Reserve' which is the number after the Henchman characteristic (circled in green). This amount is added to the amount of Soulstones that you can use to purchase your crew. So (for example) in a 25 Soulstone game, Collodi would have 32 (25 plus his Henchman Reserve of 7) Soulstones to spend.
3) As mentioned previously the Special Forces hiring limit of 2 is ignored when using a Henchman as a Master and the particular Special Force that they can hire from will be listed. In Collodi's case he can only include models that are from the 'Dolls' Special Force (circled in purple).
4) The Henchman can connect a Totem just like a Master could with the same limitations. So Collodi could connect a Neverborn Totem (like Primordial Magic) but not one that is specific to a particular Master (such as Poltergeist or Malifaux Cherub).
5) The Soulstone Pool for the Crew is determined as normal with two limitations. Firstly a Henchman used as a Master has a starting Soulstone Cache of 0 and secondly that Soulstone Cache cannot be higher than their Henchman Reserve (circled in green). So Collodi couldn't start with a Soulstone Pool of more than 7, Molly would be limited to 5, etc. even if they would be entitled to more.
6) As the Henchman is effectively a Master when leading a crew they are affected by anything that would affect a Master regardless of whether that's a good or a bad thing. So for the purposes of Strategies and Schemes they're a Master and if an ability, spell or whatever states that it can't be used on a Master then they're immune to it just like a 'normal' Master. So (for example) if Collodi was leading a Crew he would be immune to the 'Obey' Spell.

Henchman in a Master's Crew.
We'll use Von Schill as our example this time.


1) The Henchman's Soulstone cost (circled in red) must be paid as normal so in this case Von Schill would cost 9 Soulstones. If he was being used as a Master he'd cost 0.
2) The Henchman Reserve (circled in green) is ignored completely.
3) The Henchman can connect a Totem just like a Master could with the same limitations. So Von Schill could connect an Outcast Totem (like Student of Conflict) but not one that is specific to a particular Master (such as Giant Mosquito).
4) As mentioned previously the Special Forces hiring limit of 2 is ignored when using a Henchman and the particular Special Force that they can hire from will be listed. In Von Schill's case he can only include models that are from the 'Freikorps' Special Force (circled in purple).
5) A Henchman hired into a Master led Crew counts as a Henchman for the purposes of Strategies and Schemes.

So that should be all you need to know about Henchmen...hopefully...

If you have any questions or find any errors with this tutorial then feel free to leave them in the comments section below.

Thursday, 11 April 2013

Malifaux for Beginners - Leveticus and Eternally Shackled/Shackled

Editors Note - This tutorial is for version 1.5 of the Malifaux rules and has been left available for reference only. Some Malifaux 2nd Edition Tutorials can be found here...as well as quite a few of these old ones, lol.

As a regular user of Leveticus I can understand how certain of his in game 'mechanics' can be confusing. It's not for nothing that he's regarded as the most difficult Master in the game to learn. However once you've got the hang of his little... idiosyncrasies...he's a lot of fun to play with...

The fact that he needs to 'die' every turn in order to use him to his maximum effectiveness is the first hurdle for us to overcome and how that works can be a bit of a chore to understand as it involves three different rules on the stat cards for two different models, namely Leveticus's own and that of the Hollow Waif(s) that he summons. I've photographed the bits of the cards that have the necessary rules on them here for your reference. If you click on them Blogger will kindly make them bigger for you...


We'll go straight into the example and I'll attempt to clarify a few things as we go along. Lets presume that all the preliminary stages of starting a game have been done and we're about to start our first Activation Phase.

Leveticus's player will have received a Control Hand just like any other player does at the beginning of the game...unfortunately beginning with the 2nd turn you draw 0 cards during the Draw Phase (that's the time when you discard unwanted cards and then take new ones to restore your Control hand to full size) when using Leveticus..

Should you be using Rusty Alyce with Leveticus (you probably are...she's in his starter box) she has an ability called 'Something to Live For' which allows you to draw two additional Control Cards at the beginning of the Draw Phase if she's within 3" of Leveticus at that point in time. Should these extra two cards put you over the maximum Control Hand size you'll still need to discard any extras.

Here's Leveticus (A) deployed as normal on the table and the first Activation Phase is about to start. It doesn't matter if his side is going first or if his opponent is...the following happens.


As per the second part of the Pariah rule which says 'At the start of the first Activation Phase, summon a Hollow Waif to base contact with this model' we're going to put a Hollow Waif (B) in base to base contact with Leveticus (A). As this model is Summoned it will be Slow which means it loses a General Action Point (AP) this turn. The turn then carries on from where it left off.


Though a model isn't normally allowed to use an Action to do something that will reduce it to 0 Wounds (Wd), Leveticus has several Abilities, Actions and Spells that specifically say that they can do so. Leveticus should be using these to kill himself each turn (hopefully he'll kill some enemies while he's at it as well). Generally you should try and reduce him to a single Wound (Wd) and then the 'Unstable Necromancy' Ability will cause him to suffer 1 Wound (Wd) at the start of the Closing Phase.

The following list is all of Leveticus's various talents that he can use to kill himself with...

Abilities - Unstable Necromancy.
Actions - Death's Lessons, Necromantic Sacrifice.
Spells - Desolation.

Several of his other abilities can be used to hurt himself but only those above can deal the finishing blow.

Most sensible people will try to kill something with the 'Entropic Transformation' Spell early on so as to Summon themselves another Hollow Waif as a bit of a safety margin for reasons that will become clearer shortly. This needn't be an enemy model...several people bring a cheap disposable Minion or two (such as a Canine Remains or similar) specifically for this purpose.


This player has rather sensibly created a second Hollow Waif (C) at some point during the turn.


So lets say it's all gone according to plan and Leveticus has either died during the turn or has lost his final Wound (Wd) to 'Unstable Necromancy'. So for now Leveticus (A) is absent by virtue of being dead...for now...


Now the 'Eternally Shackled' Ability comes into play.


Firstly we're going to Sacrifice a Hollow Waif (B) but just before we remove it we're going to get to place Leveticus (A) in base contact with it. As you can see it's vitally important that you keep a Hollow Waif somewhere safe as you can't bring Leveticus back without one.


Then we Sacrifice any other Hollow Waifs that we might have in play.


Now we discard our Control Hand. Unlike in the Draw Phase where we would have a choice about what we keep and what we discard, Leveticus has to discard his whole hand and then draws up to the Crews maximum hand size (usually six). One of the downsides to using Leveticus is that it's impossible to save good cards for later turns unless you choose to keep him alive for a turn which is rarely a good idea given how he works. Now we move onto the Hollow Waifs 'Shackled' Ability...

If a Hollow Waif was killed or Sacrificed during the turn, Summon this model to a friendly Leveticus at the End Closing Phase. If you had more than one Hollow Waif then this applies to all of them. As 'Eternally Shackled' specifically said Sacrifice in its description any of them removed in this way now return.


Simple....relatively...I suppose...

Here's a brief summary of the above.

1) Leveticus Dies/Is Sacrificed and then the 'Eternally Shackled' ability kicks in.

Eternally Shackled:
a) During the Closing Phase -> Place Leveticus in base-to-base contact with a friendly Hollow Waif
b) Sacrifice all friendly Hollow Waifs in play.
c) Discard your hand and draw up to your Crew's maximum hand size.

2) Then the 'Hollow Waif' abilities happen,
Shackled: 
a) During the End Closing Phase if this model was Killed or Sacrificed during the turn, summon beside a Friendly Leveticus.

This means, provided at least either Leveticus and/or a single Waif is alive by the end of the turn, Leveticus and/or any removed Waifs will return prior the round ending due to the order that the cycle occurs in.


Hopefully that clears up any issues you might be having with at least one of Leveticus's unique little issues.
If you have any questions or find any errors with this tutorial then feel free to leave them in the comments section below.

Related Posts with Thumbnails